Thursday, August 30, 2012

CTC Unit 4 Watercolor Tutorial

Creation to Christ Unit 4 Watercolor Tutorial 

Day 2

I'll not list your supplies here as they are available in the Creation To Christ Guide. We are doing another wet paper technique today so I got out my Big Ol' Paint brush which I find so handy, it is optional as is the backing board and masking tape. 

Optional: Tape down your paper.
Put your colors on the pallet. Don't forget it is easier to add more paint than it is to put it back in the tube. Start with a pea size amount. :-) I like to put my paint out in cool to warm or light to dark
depending on what I'm working on here I placed them light to dark. 
 Wet the paper.
Blot any puddles with paper towels or a rag.
 I find wetting my brush before I load up my paint brush with paint helps it flow more smoothly. Also giving a quick stir on the pallet also helps get it on the brush. 
This time keep going back for more paint. You want the blue sky to be more evenly colored, but remember your paper is wet so don't over work it. 
Over working the paper: If you find your paper is pilling (getting little dots of paper pulp on your work surface) you are over working the paper. 
 I clean your brush after you have painted the blue sky.
The sky should reach halfway down the paper.
Equipment Note: Please do not leave the brush in the water,
this harms the bristles, but rather swish it around
and blot it on that paper towel you used earlier. . 
 Ok now (unlike me Oopsie!) switch to the smaller round brush! add a few drops of water to the brown paint and load your brush up. 
 Overlap the blue and brown at your horizon line. 
 For the next step pick one side of your yellow, with your dirty/brown paint,
brush load up a bit of yellow on to it. 
Overlap the dirty yellow on the brown and paint down. 
 Once you have exhausted the dirty yellow paint,
pick up clean yellow from the opposite side of your yellow paint. 
Now lay down the yellow.  
 See here I'm pulling the green paint out towards the yellow. 
Here I am letting the yellow and green mingle on my pallet,
to make the transition to green for the bottom of my painting.  

 Look here the paint is puddling. Icky I don't like that! 
 With a clean damp brush, I let the brush soak up the excess and swish it back n' forth. 
 I had to do it again here for the green.  Now set your painting aside and let it dry for tomorrow. 
Little Miss Sunshine says wash and dry your equipment. 
Sweet Potato says pack up your paints neatly and put them away. 

Day 3

Here is what you will need for today's work I don't have purple so I got out my scarlet and blue. 

 I only have a bit of blue and I found out I needed a wee bit more blue to get a decent purple. 
 A few drops of water in my paint was needed to get it to flow. 
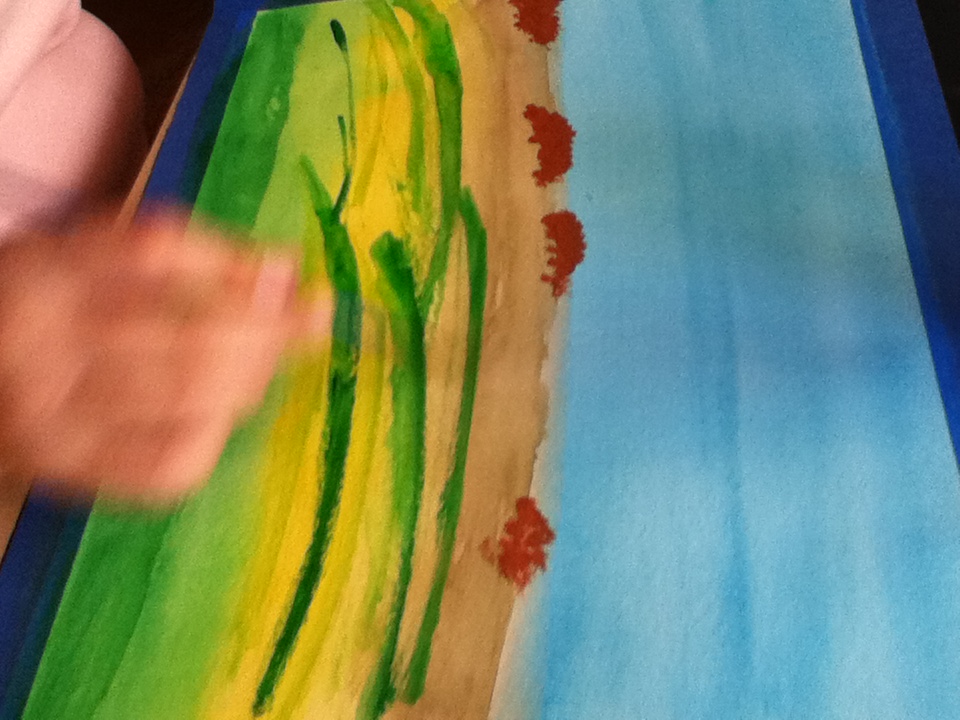
Paint in your bushes, breaking the horizon line.  
 Clean your brush by rinsing and blotting to get out the brown before switching to the green paint. 
You can make many variations on the green as you paint.
If you add yellow you will get a lime green. 
 I imagined it was sightly hilly so my lines are not exactly straight.  
 You can mix the yellow with the dark green, in a new spot on your pallet and make a medium green. 
 I felt the paint was a bit dry I dipped my brush in water when I felt the paint was to globby.
 (I wonder is globby a word?) 
Adding dark green straight from the tube to my painting. Using lots of greens help give your painting depth and makes it more realistic. Ever go look at a field? it has lots of different colors.   
 Meld your colors a bit if you like. 
Load up the tooth pick. 
 I find if you use a rolling motion with the tooth pick it lays the paint down pretty well. 
After you paint with one color green layer on a lighter or darker color green.
This gives depth to the grass. 
 Since I didn't have purple I mixed one up from red and blue. 
 Don't forget to clean your tooth pick I didn't want greeny-purple flowers. 
 Just tapping the paper gave me nice little buds for flowers I decided to go for a monkey grass kinda flower. 
 See how nice that looks! I was happy. Don't forget to sign your work! 
 Sometimes Sweet Potato decides she gonna do her own thing, here are her horizontally curved lines :-) 
 Mom I'm going to make it really hilly! 
 Such concentration. 
 Moving quickly to add in yellowish green lines. 

My finished masterpiece!  

Another one This is Little Miss Sunshine's
Sweet Potato decided to keep hers to her self. 
Don't forget to pack up your supplies, clean your brushes, and equipment. 

Tuesday, August 28, 2012

Holding Firm

Today I asked Sweet Potato to do a character study on her reading book. I really can't do Dithor (Drawn Into the Heart of Reading) with her at her level of comprehension. Recently I found a book of folk tales from India, she has actually been interested in these. So knowing repetition is the key to her success, I decided to have her read these for her interest study and reading comprehension.

Yesterday she did a fantastic job of giving me an over view of the story in a written narration. Today I wanted her to pay attention to detail hence the character study assignment.  Over all she found plenty of details on the main character. Since we covered paragraph creation in grammar yesterday, I asked for a paragraph.  I'm always looking to kill 2 birds with one stone, not to mention repeat, repeat, repeat is so critical to her learning. I feel may be emphasizing the repeat thing a bit to much? 

Do you think she gave me a paragraph??? do you huh huh huh? Of course not!

In fact there were 5 incarnations of the words on the page but not in paragraph form.  I know part of my problem was I was tired. School went fairly well today, only a 45 minute hiccup over math. I thought she could  Do This With Out Me Being Present. (un-clench the teeth mama)  She did take it up to her bunk bed and close the door, I really felt I was free to have some Facebook free time.

She brought down a page of bullet points, all starting with the word Gopal.  I did remember to sandwich my criticism of not a paragraph and use pronouns, in between praise of handwriting and detail work. but man this child would not write it into a paragraph form. After the 2nd odd form of paragraph writing and reviewing how to write a paragraph.  It dawned on me... Shes playing me!!! Shaking off the afternoon lethargy I cleared my head and realized this is just more of the same.  Ohh she is good Miss Manipulation is poking her head out again.

Gratefully I didn't lose my temper or get mean (and say something stupid), I just realized she is not doing as I requested "on purpose." So I played along. I mean what is the fun of parenting if you can't turn the tables on em every so often.

I  kept sending her back to rewrite it from the beginning, in a paragraph form.  It took 6 tries before she decided she didn't want to do it again and chose to do it correctly.  After she handed in a acceptable paper I had her sit down next to me.  I praised it, corrected one mistake and said Good Job! and asked "Now tell me what made you choose to do it right this time?"  after some hemming an hawing she replied "because I didn't want to do it again."  Score!!!! one Mom child um well er never mind... lets not go there.  Wow Great choice ok now you have piano practice and chores then you can have free time.. Oh look Daddy is now home dinner in 20 minutes.

We have prayer meeting tonight and we try to go early so the kids have time to chat and play four square. She was 10 minutes late to dinner, 10 minutes late to doing her vest time, and 10 minutes late to prayer meeting.  It was so Awesome that she did this to herself.  Like Kevin Leman says, sometimes you just have to pull the rug out from underneath them and let them fall.  What you had no free time today? Oh well. What you missed chatting with your friends??? Sorry not my fault, you got to look in the mirror for that one.

Was I frustrated yes, but only because I hate to watch it. No one likes their child to fail. Although Sweet Potato seems to have turned it into a art form? hobby? lifestyle? I'm glad I stuck it out I'm hoping that standing firm, and letting her make poor choices and dealing with the consequences now. Will help her make better choices in the future.

Thanks so much for the positive feed back on the water color tutorials. I'm so glad you are all stepping out into new territory with your kiddos. I find this the fun-ist part of school!

My Campaign over at GFA is a bit neglected so if you want to enrich the lives of women who can't read you can donate here https://www.mygfa.org/gardenforsara/ 

Monday, August 27, 2012

CTC Unit 3 Water Color Tutorial

So I have to admit I wish my blue was lighter and my colors not so bold. Tho we did get a dust cloud effect I was not satisfied with my painting. Don't worry; not being "satisfied" is a huge part of being an Artist. It's O.K to not love or even like a painting after you are done with it.

It's good to learn what went wrong and try not to repeat that mistake too often. I realized the problem lay in the fact I had to mix white into my red to get a rose or pink color. Once you add a white or black to a paint it becomes more opaque.  Depending on your paint set you may or may not have the Rose tube.  Don't let that stop you tho go and have fun. This is a great project for Messys.

Towards the end there is another "How to Fix a Mistake" so read all the way to the bottom!


Day Two 

 Gather your supplies these are listed in your guide so I won't list them here. 

 Lullaby came for a visit here she is taping down her paper.
Putting down newspaper helps keep your work area clean. 
 A small amount of paint is all you need.  Here I put them in order from cool to warm, dark to light.  
 Since I didn't have Rose. we mixed white and red to make a rosy pink. 
 lay down the blue, just like we have done before. 
 I tried to get it really wet at this point, because I want the rose and blue to meld together on the paper. 
 See how I'm overlapping the rose on top of the wet blue. 
You can see hints of purple coming through  :-) I like that 

Once you are done with the rose, overlap the yellow. Follow the instructions in the guide.
Day Two is all done! Set aside in a safe place to dry. 
Don't forget to wash your brushes and pallet. 

Day 3 
 Gather your supplies as they are listed in the guide. 
 After mixing your rose up move the paints to another spot on your pallet. See how I have dabbed just a tiny bit of yellow a medium bit of blue and a bunch of rose, now mix well. 
 Ahh a nice bluish grey
 Now I dabbed it on my paper. 
 I loaded some rose on my brush and mixed it into the grey see how it is becoming a pinkish grey. 
 More cloud dabbing. 
Now I loaded a bit of yellow on my brush and mixed right over the top of the pinkish grey. 
 A yellow grey with hints of pink is the result. 
I wish my clouds looked more like fish scale clouds now but I sure had fun mixing paint! 

Little Miss Sunshine and Sweet Potato making clouds.  
 Lullaby dabbing away. 
 Another reminder if you don't want painted highlights, put up your long hair. 
 Lullaby did not have a light blue paint. She mixed her dark blue with white, but the blue was quite strong. Maybe a tad more white would have been helpful, she liked her painting just the way she did it. 
 Sweet Potato adding in the yellow clouds 
 Little Miss Sunshine got creative and added yellow highlights to the not so dark cloud. It really looked nice. 
 Don't forget to sign your masterpiece, clean your work space and wash your brushes. 

How to fix a Tear
(because I was impatient and didn't wait for my painting to dry fully.) 
 Oh no!!! It tore when I took off the tape. 
 Handy dandy glue stick to the rescue. (or you can mix up a bit of flour and water). 
Apply glue carefully on the paper only, avoid the paint as the paint will bleed. With clean fingers carefully lay down the tear and hold. Now it's all better.