It's good to learn what went wrong and try not to repeat that mistake too often. I realized the problem lay in the fact I had to mix white into my red to get a rose or pink color. Once you add a white or black to a paint it becomes more opaque. Depending on your paint set you may or may not have the Rose tube. Don't let that stop you tho go and have fun. This is a great project for Messys.
Towards the end there is another "How to Fix a Mistake" so read all the way to the bottom!
Day Two
Gather your supplies these are listed in your guide so I won't list them here.
Lullaby came for a visit here she is taping down her paper.
Putting down newspaper helps keep your work area clean.
Putting down newspaper helps keep your work area clean.
A small amount of paint is all you need. Here I put them in order from cool to warm, dark to light.
Since I didn't have Rose. we mixed white and red to make a rosy pink.
lay down the blue, just like we have done before.
I tried to get it really wet at this point, because I want the rose and blue to meld together on the paper.
See how I'm overlapping the rose on top of the wet blue.
You can see hints of purple coming through :-) I like that
Once you are done with the rose, overlap the yellow. Follow the instructions in the guide.
Day Two is all done! Set aside in a safe place to dry.
Don't forget to wash your brushes and pallet.
Day 3
Gather your supplies as they are listed in the guide.
After mixing your rose up move the paints to another spot on your pallet. See how I have dabbed just a tiny bit of yellow a medium bit of blue and a bunch of rose, now mix well.
Ahh a nice bluish grey
Now I dabbed it on my paper.
I loaded some rose on my brush and mixed it into the grey see how it is becoming a pinkish grey.
More cloud dabbing.
Now I loaded a bit of yellow on my brush and mixed right over the top of the pinkish grey.
A yellow grey with hints of pink is the result.
I wish my clouds looked more like fish scale clouds now but I sure had fun mixing paint!
Little Miss Sunshine and Sweet Potato making clouds.
Lullaby dabbing away.
Another reminder if you don't want painted highlights, put up your long hair.
Lullaby did not have a light blue paint. She mixed her dark blue with white, but the blue was quite strong. Maybe a tad more white would have been helpful, she liked her painting just the way she did it.
Sweet Potato adding in the yellow clouds
Little Miss Sunshine got creative and added yellow highlights to the not so dark cloud. It really looked nice.
Don't forget to sign your masterpiece, clean your work space and wash your brushes.
How to fix a Tear
(because I was impatient and didn't wait for my painting to dry fully.)
(because I was impatient and didn't wait for my painting to dry fully.)
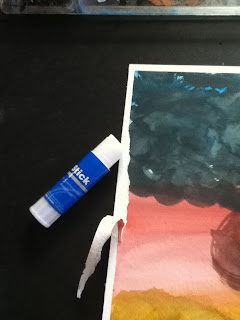
Oh no!!! It tore when I took off the tape.
Handy dandy glue stick to the rescue. (or you can mix up a bit of flour and water).
Apply glue carefully on the paper only, avoid the paint as the paint will bleed. With clean fingers carefully lay down the tear and hold. Now it's all better.


I am thrilled that you have these tutorials! We are not starting CTC until January, so you will be well on your way!
ReplyDeleteThanks and I look forward to utilizing these as I never used watercolors before..
Do you have them all in one place, week after week? That would be great as well:-)
Moedertje
I am planning to have them all located on one page eventually when I get them all finished. Then I'm planning on posting it in HOD Creation to Christ's project boards.
ReplyDeleteJust wanted to say again thanks so much for posting these tutorials. We are definitely using them.
ReplyDeletei really like these, they r so much fun!!! XD
ReplyDeleteThanks we loved doing them.
Delete